Sunday, July 2, 2017

Hello Sunshine

What do you do when you wake up at 3:00 in the morning and can't fall back to sleep?  I head to my craft table. This morning I colored.  I stamped this adorable sweet little gal with brown Memento Ink  and colored it up with my Copics.  The stamp is from Penny Black Inc and the artist is Mo Manning It is called "Sunflower Baby".

I stamped the sentiment (from Lawn Fawn) with embossing ink and sprinkled it with WOW's Primary Bark embossing powder.  Then I melted the powder with my heat gun.

The yellow paper is from Stampin' Up.  I believe it was from tone of their tea cup sets.  I have had it for a couple of years.  The blue checked is from G45 and the card stock is Bazzill.

I kept the embellishments kinda simple.  The image was so adorable,  I wanted it to be my focal point.  I did add a few liquid Nuvo drops for texture and interest.

I want to enter this in a couple of challenges:

Penny Black Saturday Monthly Challenge - Flowers
Crafty Calendar - Anything Goes
Scrapper's Delight- Anything Goes


Thursday, June 29, 2017

Graphic 45 Mystery Detective Gentlemen's Card

Hello ya'll.  I haven't posted in awhile, and I sure want to get back into blogging again.  Here's a quick post of a card I made using Graphic 45's Mystery Detective Collection.

 I created the wall with a Faber Castell Brick stencil and Viva's Ferro paste in Grungold.  I spread the paste on a black piece of card stock.  I fussy cut a scene from #It's Elementary paper from the Mystery Detective collection and attached it to the wall with foam tape.  The metal sentiment is from Tim Holtz Idea-ology.  I attached it with 2 metal brads.

I am entering this in the contest over on the Graphic 45 Facebook page.  The contest ends tomorrow, but the prize is $150.00 gift package.  Use #G45Gentlemen

Hope you enjoy and I hope to get more time visiting my old friends at their blogs.  I am looking to making some new ones too since I have been away far too long.  Looks like many of the blogs I used to follow have stopped blogging too.  :(

Have a marvelous day everyone and Happy Crafting.

Monday, May 23, 2016

Caroline's Graduation

I would like to apologize for the quality of the pictures.  I did not realize they were not the best for blogging until  I added them just now.  I can't retake the photos, because the plaque now resides with Caroline.


My granddaughter Caroline graduated from high school this past Saturday and I made this plaque as a graduation gift.  Caroline has wanted to be a hairdresser ever since she was 4 years old.  She cut her own hair at 5 and proceeded to cut cousins, dolls and classmates hair.  We tried hiding all the scissors, but the little stinker was determined to cut and style hair.  We were not sure what we were going to do to stop the problem until our hairdresser, Debbie Thompson, blessed angel that she was, lol solved our problem.  She talked to Caroline "hairdresser to hairdresser".  She told her that only licensed hairdressers were allowed to cut hair.  She told her she had to go to school and get a license before she was allowed to cut hair.  Well, thank the Good Lord, Caroline listened and stopped cutting hair.

Caroline has now graduated from high school and will be attending Aveeda school in September.  She will finally achieve her goal to be a hairdresser and this proud Nana is looking forward to many free haircuts!

I made this plaque as a graduation gift for Caroline after seeing a similar project on my friend,  Cec's blog, CW Card Creations.  
Cec designed hers for a sewing room,  but I   saw it as a hairdresser motif.  Cec is so fabulously talented in the shabby chic/vintage style.  It is a style I have difficulty with, so I tried to follow her design as close as possible.

When I showed my friends at my LSS, Cec's design, they decided to help me gather the things I would need.  Irene, Carol and Joene brought me bits of lace, doilies and hairdresser charms even some paint.  I made several trips to Michaels and AC Moore for wood, paint and charms.  I wanted a larger pair of vintage scissors and couldn't find them.  The owner of my LSS, Scrapbooks By The Sea, Rayann had scissors on order from Ken Oliver Crafts, but they wouldn't be in in time.  She let me take a pair of hers off of one of her cards and use them.  Ever heard the expression, "It takes a village....."  Well this project certainly was a joint effort.

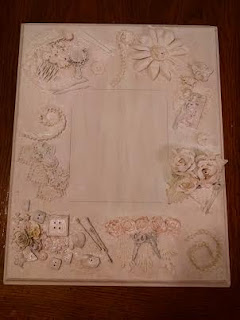
To make  this project, I used  a 2 wood plaques from Michaels, painted them both with Diana Wakeley Gesso, and then a painted a layer of Dreamweaver's crackle embossing paste on the sentiment layer.  I stenciled with Dreamweaver's Embossing paste.   I used TCW stencils.  All the embellishments were from my stash, or friends stash and were glued on with E6000 and then painted with Gesso. 

After the layer of Gesso, I sponged a layer of pink paint from Studio and then a layer of white paint watered down a bit to give the white washed look.  I sponged a bit of gold paint here and there over the whole plaque.  The sentiment is a Yvonne Blair sentiment stamp from Impression Obssession and stamped with Black Archival Ink. 


Happy Graduation Caroline and thank you to all of my crafty friends who contributed their stash to make this project possible.  Cec thanks for the inspiration!


Challenges I plan to enter:

http://stampsandstencils.blogspot.com/2016/05/think-pink.html

Wednesday, May 18, 2016

Fun With Color Burst


I recently had the opportunity to take a class at Scrapbooks By the Sea taught by Ken Oliver featuring his Color Burst Paints.  Let me first give you my major disclosure - I am NOT an artist and these cards are proof.  The reason I am posting these cards, is to show what the novice crafter can achieve using the paints and stamps Ken has designed.  The class was a blast and I went home and finished the first 4 cards.

I added some sequins, Stickles, seed beads, Flower Soft, ribbon, charms and string.  The charms, flowers and butterflys on the first 4 cards are all from Ken Oliver.  The last card was made using a script stamp from Impression Obsession and a Bird stamp from Penny Black and a Butterfly stamp from WOW.   The little lilac flowers are a die from Impression Obsession.

The last card is something I created while playing around with the paints at home.  Yes I bought 2 sets of them at class  Sorry, but I was hooked.  The paints are powder form and react with water.  They remind me of alka seltzer.  When you drop a "poof" of them on watercolor paper and spritz with water, the most glorious colorbursts appear.  Too much fun I promise you.  After all isn't that what crafting is all about?


Challenges I plan to enter:
http://thesisterhoodofcrafters.blogspot.com/2016/05/no-designer-paper.html


Friday, March 11, 2016

Lovely Thoughts Bella


Look at my sweet Bella holding on to her bunny and all cuddled up in her comfy bed.  This, as if you didn't know is a Sassy Cheryl creation called Nappy Poo Bella.  You can get her here.  I used my Copic Markers to color her.  I bought the sketchy one because I loved all the shading and texture on this image.  It helped create that vintage/shabby chic look.

The lace is a new stamp from Studio 490 - Wendy Vecchi.  You can get it over at Stamper's Annonymous.  I saw a design on Wendy's blog where she used white embossing powder to stamp this background stamp.  I thought it would provide the perfect vintage platform for Nappy Poo Bella.  

My background paper is from an older Bo Bunny collection called Isabella.  I sprinkled some Shabby Pink Rose Minable Frantage around and melted it with my heat gun.  The sentiment is from Impression Obsession and it is also embossed with white embossing powder.  The ribbon is from Stampin Up and there are a few rhinestones sprinkled around on the card for some bling.

Hope you liked my creation this evening.  Take care and

Happy Crafting,

Linda

Sunday, February 14, 2016

Valentine's Day Is For Love.


Valentine's Day is for love and I LOVE water coloring with my Gelatos.   I had 3 days off and I was supposed to do laundry, clean the house, bathe the dogs, wash the car, etc.  But what did this little girl really do?  I spent 3 days crafting.   The first day I made 4 cards for an upcoming Graphic 45 Class I will be teaching.  OK Job #1 done.  Day 2 I made 2 Birthday cards for some special little boys in my life and I made some party table cards for them. Colored in my coloring book. Day 3 - Whatever day and whatever turned out to be Gelatos.

Have you all tried them yet?  Oh my gosh, they are so versatile and fun to craft with.   The colors are over the top gorgeous and you can do just about anything with them.  Spray, create backgrounds, watercolor, stamp, stencil, color pastes and texture creams, splatter.  You can spread them with a baby wipe, your fingers, paint brush, sponge whatever you can imagine.  Do yourself a favor and give them a play time.  Your won't be disappointed.  (If you need ideas or instructions, just search gelatos on You Tube.  There are lot's of tutorial videos).

To do this project,   I "colored" Blood Orange and Iced Coffee Gelatos on a small flower stamp .  I then misted it with water and stamped it randomly all over the watercolor paper. After it dried I colored "Butter" and "Blood Orange" gelatos all over the paper and blended them with my finger which I kept moist with water.  After that dried, I took a gold pen and dotted the paper for a bit of glitz.  I colored a bit of Iced Coffee gelato on my craft mat and stirred in a bit of Gesso.  I dipped my Splatter Brush into this mixture and "Splattered" the background paper.

Next I used the same stamping technique and stamped 3 large flowers with Blood Orange Gelato and 2 leaves with Iced Coffee Gelato. After these dried I fussy cut them out and used foam tape to mount them on the card.  The stem was painted with a aqua brush free handed. I then matted it with a paper from Prima's Seashore collection and mounted it on a white card stock base.

I am afraid this was my last free play day for the week.  I have things scheduled for everyday this week.  I'll just have to savor these memories until next week, when just maybe I can sneak another free play session in.  If you have some free time this week, go grab something, anything and as Wendy Vecchi says, GO MAKE ART!

Happy Crafting,

Linda

Challenges I Plan On Entering:

http://avenue613.blogspot.com/
http://welove2create.blogspot.co.uk/2016/02/challenge-4-anything-creative-mixed.html#comment-form
http://lacysunshine.blogspot.co.uk/

Sunday, January 24, 2016

Hello Friend


Hello Bloggy friends.  I am back again with another Bella from Sassy Cheryl.  Cheryl is just driving me crazy with these new Sketchy Bella images and I HAVE TO HAVE THEM ALL!  

I found this technique on a blog I follow and it looked perfect for what I wanted to do to showcase this Teacher's Pet Bella.  Here is the link to Janey's Card's Blog where you can find my inspiration.  

The back ground is made using finger daubers and Tim Holtz's Distress Ink.  For this one I used Squeezed Lemonade, Wild Honey and Scattered Straw.  Just swirl little circles around and around until you get the effect you are looking for.

I colored Bella with Copic Markers (lots of them lol) and fussy cut it out.  It's popped on with foam tape.  The sentiment is from Stamper's Anonymous-Tim Holt's Crazy Talk collection.  I put a bit of Glossy Accents on the glasses.

Hope you enjoyed seeing my play time.

Linda

Monday, January 18, 2016

Bella's Having a Bad Hair Day


I belong to a couple of card clubs, "Inky Digits" and "Silly Stampers" and we have to bring a handmade card to the meeting.  All the cards are placed in a drawing and one lucky member wins all the cards. I didn't put a sentiment on this card so the winner could use it for whatever occasion she desires.

The image is called "Bella's Bad Hair Day" and when I saw it on FB, I knew I had to color it up.  Isn't Bella adorable.  Cheryl posted another Bella image today for National Teacher's Day.  Bella is peeking out from behind a big ole' apple and wearing a big ole' pair of glasses.  That one is coming home to me too,  Just can't resist these adorable little Bella's.  If you want to check out her FB page,, it is called Sassy Cheryl's Neighborhood.

Products Used:
Paper  - Kaiser Craft's Teddy Bear's Picnic
Cardstock -Bazzill
Button and Bakers' Twine from my stash
Stitched Circle Die is from Lawn Fawn
Coloring Medium - Copic Markers

Have a wonderful day and wish me luck tomorrow at Club!

Linda

Sunday, October 25, 2015

Trick or Treat


I have been a bit "Bird Crazy" this past year.  It was love at first sight for me and Tim Holtz' s Crazy Birds.  It turned out there were lots of Bird Lover's out there because Pinterest is full of creations using these little guys.  I started making my own accessories for them even before I found out Tim was releasing a set of accessories.  Then came the sayings and the dies, OMG I had to have them.  I work and teach at my LSS, Scrapbooks By The Sea so I was able to snatch them up as soon as the shipment was unpacked.

My Grandchildren don't live near me anymore  so I have to mail their cards and treats. Even though they are all grown now (my youngest gran is soon to be 16) they still like receiving treats and cards in the mail and this ole' grandma looks forward to making them.

This year, I use the Stampin Up treat bag die to make the holders.  It cuts out and assembles so quick and is the perfect size and shape for mailing.  The paper is from Bo Bunny and the heavy weight card stock works perfect for these bags.  I used the SU Spider Web doily as a mat for each bird and then got busy creating costumes for my darlings.

The Tim Holtz Crazy Bird Accessories set includes the pumpkin, top hat, bow tie, witches hat and broom.  I created the magic wand with a star punch, silver Stickles and a piece of vellum.  The ghost is a piece of velum, the vampire cape is a piece of black tulle.  The princess veil is a piece of pink tulle and her crown is a Tim Holtz stamp from an old set that I stamped with versa mark and heat embossed using silver embossing powder I added some gems with silver and purple Stickles.

I colored everything with Copic Markers.  These are "Crazy Birds" and I just colored them quickly with crazy colors.  I wanted them to have that fun abstract look, so I did not get detailed with my coloring.  I drew a couple of fangs on the vampire and used a red marker to create dripping blood and blood shot eyes.  All the eyes are covered in Glossy Accents.

I wanted to write a personal note to each of my grans so I made tags  to tuck down in the bags.  I used a SU tag topper punch  and the stamp set was a Hampton Arts set.  I used Tim Holtz Crazy Sayings "trick or treat" stamp to stamp a sentiment on the seam binding.

Added a bit of wrapped candy and some shredded paper and they were ready for mailing. Hope those grans of mine get a kick out of them.

Happy Halloween!

Challenges I plan to enter:

Allsorts- Purple Black or Orange - http://allsortschallenge.blogspot.ca/
Inspiration Destination - Anything Goes  http://inspirationdestinationchallengeblog.blogspot.co.uk/search?updated-max=2015-10-22T00:00:00-05:00&max-results=1

Sunday, October 18, 2015

Poppin' In To Say Hi


My goodness it has been a long long long time since I posted here on my blog.  I have been very busy and I will fill you all in on some of the details in a later post.  Tonight I needed some down time just for me, so I grabbed this Sassy Cheryl digi and my colored pencils and just chilled out.

I used Faber Castell Polychromos on the image and blended with the pencils themselves.  I decided not to use Gamasol to blend here.  The buttons are made with a Sakura Black Glaze pen and the buckles are a Sakura Silver Metallic pen.The sentiment is from Stampin Up' Teeny Tiny Wishes stamp set.  I used a SU punch for the sentiment.The pumpkin brad  and sheer ribbon are from Scrapbooks By The Sea, my local scrapbook store (LSS). DP is Reminisce and the CS is Bazill.

I hope to get around to visiting some of my old bloggy buddies.  I miss "talking" to all of you.  Check back later and I 'll catch you up with what has been going on in my little corner of the world.

Happy Crafting Ya'll!